Dynamic Duo
Overview
Students will investigate the concepts of density and neutral buoyancy using various materials to build two "plankton" that will hover somewhere below the surface or above the bottom of a container of water. In the extension, students will be introduced to the concepts of viscosity and Reynold's number and how viscosity and surface area play a part in the motion of plankton.
Background:
Phytoplankton are found near the surface of the water column. The water column is the distance from the surface of the water to the bottom. The soda bottle represents the water column. Zooplankton are found deeper than the phytoplankton, but not at the bottom. Both can move up and down the water column, but are subject to the currents in the water. They move mostly with the currents, but can a little bit on their own.
Instruction Time
The main activity should take about 45 minutes. The extension should take about 20 minutes.
Objectives
- Students are expected to investigate where plankton reside in the water column and how they remain there.
- Students are expected to have some knowledge of density and or buoyancy.
- Students should be able to identify when an object is at neutral buoyancy.
Materials
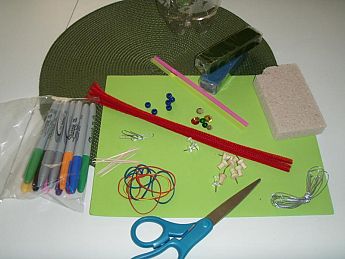
- Various colors of modeling clay including green- each group must start with a 1? gram piece. Use green clay for the phytoplankton.
- Straws
- Tooth picks
- Plastic thumb tacks
- Pipe cleaners
- Plastic beads
- Foam sheets or packing peanuts
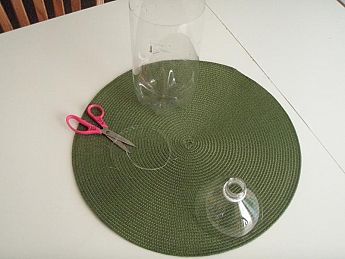
- Clear plastic 2 L soda bottle with top removed and edges cut smooth. (See Picture 1)
- Permanent markers of various colors.
- Glitter
- Sand
Procedure
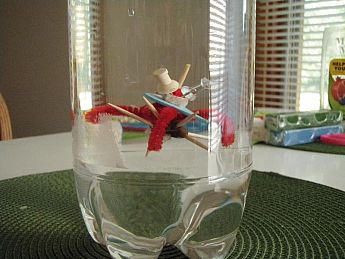
- Using the clay piece and various items of their choice, each student or group of students will build a model zooplankton that must hover midway. They may not float on the surface or lie on the bottom. Remember your plankton has to eat, so include a mechanism in your design.
- Then, build a phytoplankton model for the zooplankton to eat. The phytoplankton must float just below the surface.
- Fill the bottom of the soda bottle with water and test out the plankton.
- When the plankton hangs properly in the water, it's time to build it an ecosystem. Empty the bottle and using sand and markers create an environment for the zooplankton and phytoplankton. Remember to include food (glitter) for your phytoplankton to eat and places for the plankton to hide.
Lesson Resources
National Science Education Standards
K-12 Unifying Concepts and Processes
-Evidence, models, and explanation
9-12 B Physical Science
-Structure and properties of matter
-Motions and forces
9-12 C Life Science
-Interdependence of organisms
-Behavior of organisms
FAN-tastic Feeding
Overview
This activity introduces students to a type of motion that zooplankton use to catch their food. Students will use different objects to mimic the motion of the zooplankton and determine which has the best results helping them understand some of the appendages that zooplankton have and why.
Background:
Zooplankton feed on phytoplankton and on smaller zooplankton. One method they use to capture their prey is to set up a feeding current by sweeping out their feeding appendages. This creates an inward flow of water that brings the prey towards them. There are videos online demonstrating this interesting method of feeding.
Instruction Time
This activity takes about 25 minutes.
Objectives
- Students are expected to investigate plankton feeding currents.
Materials
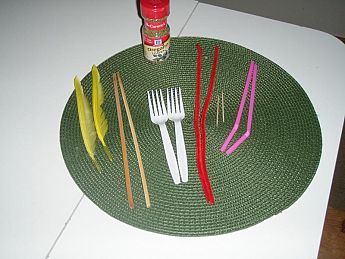
- 2 Feathers
- 2 Plastic forks
- 2 Tooth picks
- 2 Pipe cleaners
- 2 Chopsticks
- Long pan to hold water
- Dried flakes like parsley or oregano, pepper will work also.
Procedure
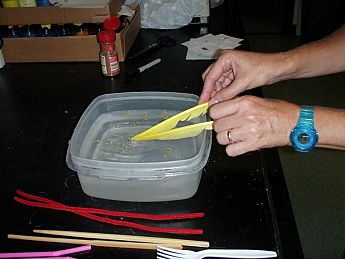
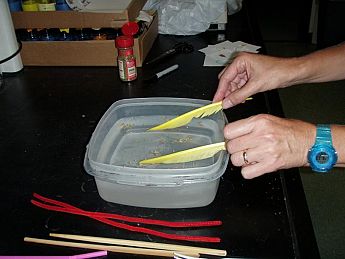
- Fill pan with water and after the water settles, add a small amount of dried flakes. Be sure the water is still before adding anything.
- Choose one of the pairs of items. Hold the two pieces together, then gently spread them apart in a fan-like or sweeping motion.
- Observe the motion of the flakes on the surface. Repeat the process with each different pair of items.
- Record your results.
Lesson Resources
Online videos:
- Copepod filtering current: https://www.youtube.com/watch?v=Ggk2O7p4vWQ
- Rotifer feeding: https://www.youtube.com/watch?v=cYNJOVDQexA&feature=related
- Rotifer feeding: https://www.youtube.com/watch?v=49RROi71bbA&NR=1&feature=fvwp
National Science Education Standards
K-12 Unifying Concepts and Processes
-Evidence, models, and explanation
9-12 B Physical Science
-Structure and properties of matter
9-12 C Life Science
-Interdependence of organisms
-Behavior of organisms
Phyto or Zoo?
Overview
Students will be introduced to different types of phyto and zooplankton and build their own dichotomous key through an inquiry based lesson.
Instruction Time
90 minutes (2 45 min class periods)
Objectives
- Students will understand taxonomy and be able to separate things by characteristics.
- Students will understand dichotomous keys, their purpose and will be able to create their own.
Materials
- Pictures from the lesson of phyto and zooplankton (1 for each group or enough laminated copies for one class)
- Paper (legal size if available)
- Pencils or pens
- Shoes (or candy, backpacks, pens, cell phones, etc)
Procedure
- Begin the lesson by asking if the students can explain taxonomy. Allow a few minutes for them to give you their definitions.
- Next, have the students gather around a table or make a circle and place their right shoe in the center. If the students wear a uniform, you can use candy, marbles or legos or have them use their backpacks, pens, pencils, or cell phones.
- Have the students separate out the shoes/items into 2-3 categories based on similar characteristics. They can do this many different ways: by shoe type, color, shape, laces/no laces, etc but they must explain why they separated them the way they did. Step back and allow the students to think this through. This may take a few minutes for the group to agree but that’s OK because the thought process is the important part of this activity.
- When they decide on the first group, have them then separate the shoes/items again into sub-categories. Again is it important for them to work through this as a group and think through the process.
- Repeat the previous step again one more time.
- Ask them if they are satisfied with the way they categorized the shoes. Ask the students why they decided to it the way they did. Is there anything they would change? Why?
- Have the students write on the board on a piece of paper which shoes were in which category or leave the shoes where they are. You will need this set up again later in the lesson.
- Now explain that categorizing or grouping based on similar characteristics is called taxonomy. If resources allow, pass out a set of the plankton pictures to each group/individual for them to cut out and arrange on a sheet of paper. Another option could be to have a few sets (enough for one class to use) and laminate them so they can be reused.
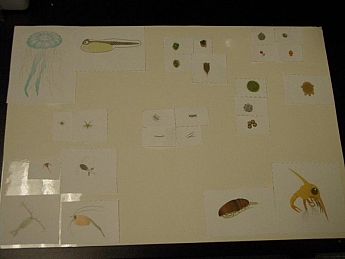
- Pass out the sheet of phyto and zooplankton pictures to the students. Now it is up to them group the different organisms based on similar characteristics. This can be done in groups or individually. There is no right or wrong answer for this. Students can separate the organisms anyway they choose as long as they have a reason for doing so.
- When the students have decided on how individuals should be separated, have them layout the plankton on the sheet of paper in the groups they decided on. Have them list on a separate sheet of paper which organisms are in which groups and the similar characteristics they share so you know why they separated them the way they did.
- Once they finish categorizing the organisms, bring the group back together and go back to the shoe activity. Put the shoes back in the original groups they were in and let the students know they are now going to create a series of questions that will lead them to a specific shoe or group of shoes.
- As a group have the students discuss the questions they could ask that will lead them to that shoe or group of shoes being separated from the whole group: Does it have laces? Yes or no. Is it an athletic shoe? Yes or no. Is the shoe green? Yes or no. Many other questions could come up but these are just some examples.
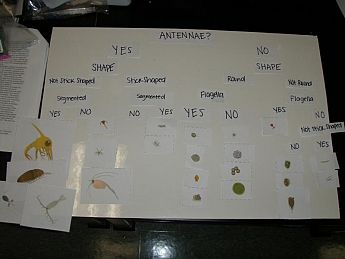
- Write the questions on the board the students came up with. Let them know just created a dichotomous key for their shoes. If they aren’t familiar with the term ask if they what dicot or dichotomous means and that might help them come up with a definition. A dichotomous key is a series of paired statements that gives you two choices and based on your answer, you will be lead to another question until the organism is identified. For example, they could ask does the organism have a shell or no shell? If they answer shell, they go to the next step and if they answer no shell, they will proceed to a different step. See the examples in the background section.
- Now they are going to create their own dichotomous key based on the plankton they have just categorized. The will can either start from the beginning and work forward or start at the end and work their way back to the start. Again, there is no right or wrong answer. The purpose of this activity is for students to get comfortable with the ideas of taxonomy and keys and to get them to critically think about how different characteristics of organisms.
- Once they have decided on the questions, they can now glue their plankton pictures to the paper and write the questions or break down of how they separated them on the sheet.
- Finish up the lesson by asking the different groups to present their taxonomy and dichotomous keys of plankton. Be sure to ask them why they separated the organisms they way they did. There will more than one answer based on how the students think and this is OK as long as they explain and have a reason for why they did what they did. If the put an organism in a group because it didn’t fit anywhere else, that is not a good reason. If they separated based on color, shape, size, appendages, etc. then that is OK.
Extension Ideas
Go out and collect live plankton from a local body of water and have the students observe under microscopes. Then have them create a second dichotomous key based on the live plankton.
Lesson Resources
![]() Plankton Classification Images
Plankton Classification Images
![]() Plankton Classification Labels
Plankton Classification Labels
Scientists use taxonomy to classify organisms based on similar characteristics. They use dichotomous keys to help classify unknown organisms. Plankton are characterized by their shape, appendages, Examples of dichotomous keys
- https://sea.sheddaquarium.org/sea/pdf/SEA_key-dichotomous2.pdf
- https://sea.sheddaquarium.org/sea/pdf/SEA_key-dichotomous1.pdf
- https://sea.sheddaquarium.org/sea/pdf/SEA_key-dichotomous1.pdf
- https://dnr.wi.gov/org/caer/ce/eek/critter/watercritter/key.htm
- https://ashscience7.wikispaces.com/How+to+Use+a+Dichotomous+Key
National Science Education Standards
-Abilities necessary to do scientific inquiry
-Understandings about scientific inquiry
-Interdependence of organisms
-Matter, energy, and organization in living systems
What will I be when I grow up?
Overview
Many organisms are plankton during their larval stages and grow to be very different-looking organisms as adults. In this activity, students will match pictures of larval and adult organisms.
Instruction Time
20 minutes.
Objectives
Students are expected to match larval pictures with adult pictures of various plankton to introduce them to some of the wonders of the aquatic world.
Materials
Worksheet of larval and adult pictures of several different plankton.
Procedure
- Each group of students will be given a worksheet with a set of larval and adult plankton pictures.
- Students will pair up the larval and adult pictures and then compare them to a key given at the end of the activity
Questions:
- How do the larval and adult pictures of a single organism compare? Give details.
- How did you determine which larval picture went with which adult picture? Be specific.
- What are the similarities between the larvae and the adult organisms? What are the differences?
Lesson Resources
National Science Education Standards
-Systems, order, and organization
-Biological evolution


